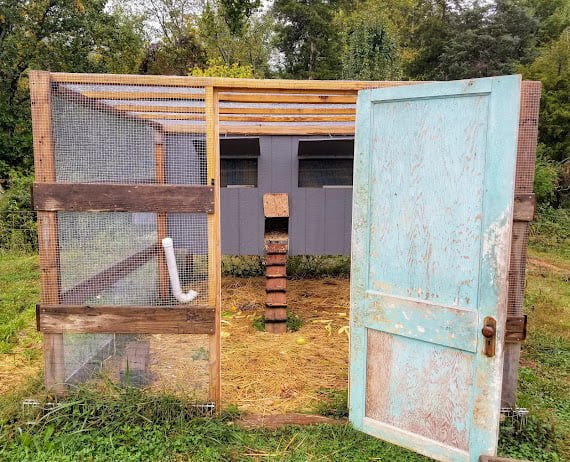
The Chicken Coop
Time for a tour of the chicken coop that James built! While the roof and hardware cloth was bought new, most everything else came from scrap wood collected through Craigslist. The antique door we found for $5 adds such a charming touch!

When we built this, our intentions were for our chickens to free range during the day, and then lock them in their coop at night. We have made the run predator proof, so we seldom close the door to the actual house. This also means we don’t need to rush out first thing in the morning to let them out as they have access to food, water, and space.
James started designing the chicken coop in January and had it ready for the birds to move in mid-May. It took much longer to build than we had imagined, but we were also distracted by other projects. During construction, our young chickens were living in a chicken tractor.
Inside the Chicken Run
This is inside the chicken run. We close the windows for winter. The chickens still have adequate ventilation as there is a couple inch gap between the roof and walls. This gap is also covered in hardware cloth.


James made the PVC feeders which are great at keeping the food dry and clean. James used sticks to make the chicken ladder. Notice the watermelon rinds…we often carry out kitchen scraps in the evenings to help get the chickens in when we are ready to lock them up. While there is a door on the house, we have only closed it when we were training our chickens to their coop.
James made the watering bucket too. With its capacity, we need to refill it about once a week. This helps to reduce daily chores. While this 5 gallon design was great for our original flock of 6, when chicken math hit the following summer and our flock maxed out at 29, we were refilling our 5 gallon waterer daily. That’s when we began building our 55 gallon waterer which we connected to a rainwater catchment system off of the chicken coop roof. You can see this new large capacity design here!
Inside the Chicken Coop

Here’s the cleanout side from the outside. The large door goes up, and the bottom 6 inches comes down to make it easy to rake right into the wheel barrow. If we were to make improvements to our design, this is where it would be. It is difficult to reach all the way across the entire length of the chicken coop to rake out the waste and add wood shavings. James would prefer to have the cleanout door along the entire backside. Another improvement would have been to line the inside floor with linoleum to make a moisture barrier and to make it easier to clean out.
This is inside the house from the clean out door. When the picture was taken, it was time to change over the bedding. We’re using the deep litter method. You can see we have 2 lines of roost. Across from here, you see the 3 nest boxes. Another improvement would be to add a lip to the nest boxes to help keep straw in them to make for better nests.

Outside the Chicken Coop


This is the nest box side. The roof on the nest box lifts up for easy access. There are hook latches on this to keep it secure from predators. Speaking of security…You know that metal closet shelving? It looks remarkably similar to Dig Defence (a product sold to keep dogs from digging out of their fences) and much cheaper when bought second hand. James trenched the ground around the entire perimeter and installed the metal shelving to keep predators from digging in.
